How to Recreate Reddit with Dgraph and Vue.js
Dgraph is able to handle robust data sets, even those from applications built designed to use more traditional relational databases. With just some minor adjustments to your thinking you’ll see how Dgraph and its GraphQL+- syntax can be used to work with large data sets from popular real-world applications.
In this tutorial we’ll walk step-by-step through the process if creating a Reddit-style front end application using massive, real-world Reddit data dumps imported into Dgraph. We’ll explore how Dgraph efficiently manages large data sets, even while running within relatively humble Docker environments. We’ll also see how, with just a few minor adjustments to our application logic, we can use Dgraph to query and mutate data that wasn’t designed to work with a graph database like Dgraph in the first place. We’ll see how multiple types of objects can share the same fields (i.e. predicates) within Dgraph, and yet the power of GraphQL+- queries will allow us to differentiate between record types in whatever manner is best suited to our application.
In addition to Dgraph for our database we’ll also be using the Vue.js framework to create the front end application. This lets us build out a responsive and modern version of Reddit that can easily be modified to include addition functionality. Vue provides a number of advantages over other popular libraries by allowing us to combine HTML, CSS, and JavaScript for a given component within a single file, which dramatically improves readability and separation of concerns.
You are encouraged to follow along with the tutorial step-by-step, but if you want to reference to full code set feel free to check out the repository at any time. With that, let’s jump right into it!
Create a Vue CLI Project
Start by globally installing @vue/cli.
yarn global add @vue/cli
Create a new Vue project. In this tutorial our project will be named dgraph-reddit, but you can call your project anything you’d like.
vue create dgraph-reddit
Choose to Manually select features and then choose the following options:
- Please pick a preset: Manually select features
- Check the features needed for your project: Babel, TS, Router, Vuex, CSS Pre-processors, Linter
- Use class-style component syntax? Yes
- Use Babel alongside TypeScript for auto-detected polyfills? Yes
- Use history mode for router? (Requires proper server setup for index fallback in production) Yes
- Pick a CSS pre-processor (PostCSS, Autoprefixer and CSS Modules are supported by default): Sass/SCSS (with dart-sass)
- Pick a linter / formatter config: TSLint
- Pick additional lint features: Lint on save
- Where do you prefer placing config for Babel, PostCSS, ESLint, etc.? In dedicated config files
Wait a few moments for the installation to complete then navigate to the project directory and execute yarn serve to see that your app is up and running. By default, the dev server is available at http://localhost:8080/, but vue-cli-service may choose a different port if it detects 8080 is in use.
$ cd dgraph-reddit
$ yarn serve

  App running at:
  - Local:   http://localhost:8080/
  - Network: http://10.0.75.1:8080/
You can opt to keep the dev server running once development begins, but for now it’s best to terminate it (Ctrl/Cmd + C).
Install Node Packages
Let’s also take a moment to install some additional dependencies we’ll need to get started, particularly since we’ll be using TypeScript.
yarn add dgraph-js-http gulp gulp-typescript
yarn add -D @babel/polyfill @types/gulp @types/node ts-node cli-progress @types/cli-progress
Prettier & TSLint
We’ll be using Prettier and TSLint for our linting needs throughout this guide, but feel free to use whatever setup you prefer. If you wish to use the same solution, you’ll want to configure your editor to execute Prettier/linting upon save. That’s beyond the scope of this article, but check out the prettier-vscode and Prettier + WebStorm documentation for more details on using some popular editors.
I also recommend adding some additional rules to the project tslint.json file to disable the no-console and trailing-comma rules.
{
  "defaultSeverity": "warning",
  "extends": ["tslint:recommended"],
  "linterOptions": {
    "exclude": ["node_modules/**"]
  },
  "rules": {
    "quotemark": [true, "single"],
    "indent": [true, "spaces", 2],
    "interface-name": false,
    "ordered-imports": false,
    "object-literal-sort-keys": false,
    "no-consecutive-blank-lines": false,
    "no-console": false,
    "trailing-comma": false
  }
}
I’ve also created a .prettierrc file in the project root directory with the following content.
{
  "semi": true,
  "singleQuote": true
}
Connecting to Dgraph
With our project configured we’re ready to get into playing around with Dgraph and adding some data that our app will use.
Prerequisites
Make sure you have a Dgraph installation available for use explicitly for this project, as you don’t want to risk your existing data. Installing Dgraph takes just a few minutes and can be easily accomplished on the local system or within a Docker container. Check out the official Get Started documentation for details on that!
Throughout the rest of this tutorial we’ll assume you’re using a local Dgraph installation at the default URL of http://localhost:8080, so please change the address to match your local install if needed.
Connecting to Dgraph Alpha
To add our Reddit data to Dgraph we’ll need to establish a connection to Dgraph’s Alpha server which hosts the predicates and indices Dgraph relies on to represent data. Since we’re creating a front-end Vue application we’ll be using the dgraph-js-http library which provides some helper methods for connecting to Dgraph and executing transactions.
Let’s start by creating a new directory at
src/dgraphto hold all our Dgraph code.mkdir src/dgraph && cd src/dgraphCreate a new file call
DgraphAdapter.ts.touch DgraphAdapter.tsThe
DgraphAdapterclass where we’ll establish a connection between our app and Dgraph through thedgraph-js-httplibrary. Let’s start by importing theDgraphClientandDgraphClientStubfromdgraph-js-http, which we’ll use to establish a Dgraph connection. We’ll also create theclientandclientStubproperties, which will hold non-nullable instances of theDgraphClientandDgraphClientStubobjects. Theaddressproperty is just the string pointing to our Dgraph Alpha server endpoint.import { DgraphClient, DgraphClientStub } from 'dgraph-js-http'; export class DgraphAdapter { public address = 'http://localhost:8080'; protected client: NonNullable<DgraphClient>; protected clientStub: NonNullable<DgraphClientStub>; }Let’s next add the
constructormethod, which will accept an optionaladdress?: stringargument.constructor(address?: string) { if (address) { this.address = address; } this.clientStub = new DgraphClientStub(this.address); this.client = new DgraphClient(this.clientStub); }This allows us to either use the default Dgraph Alpha address or override the default with our own address during invocation. Otherwise, calling the constructor just creates a new instance of the
DgraphClientusing theDgraphClientStuband sets the properties.Your
DgraphAdapter.tsshould look like the following.import { DgraphClient, DgraphClientStub } from 'dgraph-js-http'; export class DgraphAdapter { public address = 'http://localhost:8080'; protected client: NonNullable<DgraphClient>; protected clientStub: NonNullable<DgraphClientStub>; constructor(address?: string) { if (address) { this.address = address; } this.clientStub = new DgraphClientStub(this.address); this.client = new DgraphClient(this.clientStub); } }Let’s leave this for now and quickly setup a way for us to execute arbitrary code that isn’t tied directly to our Vue application. We’ll be using
Gulpto handle such tasks.
Setting Up Gulp
Like the rest of the project we’ll be using TypeScript and a number of ES6+ JavaScript features within Gulp. However, the default tsconfig.json that the Vue CLI created for us is configured to use the esnext module, which will cause an error when trying to execute Gulp commands. However, our Vue application has to use the esnext module code generation to use all the advanced features it has. The problem is that we effectively need to specify two different sets of TypeScript configurations depending on the execution stack (Vue vs Gulp), so how can we do it? The first inclination might be to pass options to the Node commands we’re invoking (such as gulp or yarn serve), but that runs into complications when we’re trying to invoke TypeScript compilation first. In particular, most libraries are configured to look for a tsconfig.json file in the root directory and overriding that project location is difficult depending on the order of operations.
To solve this issue we need to make a copy the existing
tsconfig.jsonsince it is pre-configured for our Vue application. We’ll call ittsconfig.vue.json.cp tsconfig.json tsconfig.vue.jsonNow we need to edit the base
tsconfig.jsonfile and change themoduleproperty tocommonjsto ensure it remains compatible with Gulp when it is initially registered withts-node/registerupon execution.{ "compilerOptions": { "target": "esnext", "module": "commonjs" // ... } }The
ts-nodepackage will find the defaulttsconfig.jsonand use it for our Gulp commands that are separate from our Vue application. However, if we run our Vue app again we see a compilation error is now occurring.$ yarn serve WARNING Compiled with 2 warnings warning in ./src/components/HelloWorld.vue?vue&type=script&lang=ts& "export 'default' (imported as 'mod') was not found in '-!../../node_modules/cache-loader/dist/cjs.js??ref--13-0!../../node_modules/babel-loader/lib/index.js!../../node_modules/ts-loader/index.js??ref--13-2!../../node_modules/cache-loader/dist/cjs.js??ref--0-0!../../node_modules/vue-loader/lib/index.js??vue-loader-options!./HelloWorld.vue?vue&type=script&lang=ts&' warning in ./src/views/Home.vue?vue&type=script&lang=ts& "export 'default' (imported as 'mod') was not found in '-!../../node_modules/cache-loader/dist/cjs.js??ref--13-0!../../node_modules/babel-loader/lib/index.js!../../node_modules/ts-loader/index.js??ref--13-2!../../node_modules/cache-loader/dist/cjs.js??ref--0-0!../../node_modules/vue-loader/lib/index.js??vue-loader-options!./Home.vue?vue&type=script&lang=ts&'Even though these are just warnings and compilation completes, it results in a non-functional Vue application.
As mentioned above, these errors are a result of Vue using the default
tsconfig.jsonfor TypeScript compilation, which is no longer set to use theesnextmodule for code generation. To fix this we need to tell Vue where to find thetsconfig.vue.jsonconfiguration when transpiling. Vue CLI apps are built on top of Webpack by default, so we can modify the Webpacktsrule so thets-loaderknows where to find the configuration file we want it to use.Create a
vue.config.jsfile in the project root directory and add the following to it.module.exports = { chainWebpack: config => { config.module .rule('ts') .use('ts-loader') .loader('ts-loader') .tap(options => { options.configFile = 'tsconfig.vue.json'; return options; }); } };Webpack configuration is essentially defined as a series of rules based on file types. Each rule has its own options that tell Webpack what to do with matching files. In the
vue.config.jsabove we’re using thechainWebpackproperty to add a configuration rule fortsfiles to Webpack. It uses thets-loaderand then calls thetap()method (provided by theTapablecore utility) to inject a additional build step into the Webpack chain. As you can see, we’re merely modifying theconfigFilelocation sots-loaderwill usetsconfig.vue.json, instead of looking for the defaulttsconfig.jsonfile.With that configuration added let’s try running the Vue dev server again.
$ yarn serve

App running at:
  Local:   http://localhost:8080/
  Network: http://10.0.75.1:8080/
Sure enough, that does the trick and our Vue app is able to compile without any errors.
Tip The use of Webpack is beyond the scope of this tutorial, but it’s a powerful and popular bundler that warrants learning about. Check out the official documentation for more details.
Dropping Dgraph Data
With our Gulp ready to go we can start implementing some business logic into DgraphAdapter so it can establish a connection with Dgraph and perform some transactions.
The first thing we want to do is clean out our Dgraph database so we’re starting fresh, so let’s open the
src/dgraph/DgraphAdapter.tsfile and add a newdropAll()method to the class.export class DgraphAdapter { // ... public async dropAll(): Promise<boolean> { try { const payload: any = await this.client.alter({ dropAll: true }); if (payload.data.code && payload.data.code === 'Success') { console.info(`All Dgraph data dropped.`); return true; } else { console.info(`Dgraph data drop failed.`); return false; } } catch (error) { console.error(`Dgraph data drop failed, error: %s`, error); return false; } } // ... }This method is rather simple. We’re invoking the
alter()method of theDgraphClientinstance and passing an argument object of{ dropAll: true}, which sends a request to Dgraph to drop all data. We then check the payload result for adata.codeproperty indicating a success, otherwise we assume failure.Open
gulpfile.tsand let’s add thedb:droptask with the following code.import gulp from 'gulp'; import { DgraphAdapter } from './src/dgraph/DgraphAdapter'; gulp.task('db:drop', () => { try { return new DgraphAdapter().dropAll(); } catch (error) { throw error; } });Gulp allows us to create tasks that can then be executed individually, or in combined series with other Gulp tasks. Here we just create an anonymous function that is executed when the
db:dropGulp task is invoked. In this function we return the result of ourDgraphAdapterinstance’sdropAll()method.Tip Gulp tasks expect the result of their function call to be aPromise, which is what Gulp uses to determine when a given task has completed. In this case, theDgraphAdapter.dropAll()method isasync, which returns aPromiseby default (though, since we’re using TypeScript, we also explicitly specified the return type ofPromise<boolean>). Check out the official website for more information on using Gulp and creating custom tasks.Save the
gulpfile.tschanges and execute thedb:dropGulp task with the following command.$ gulp db:drop [21:56:56] Requiring external module ts-node/register [21:56:58] Using gulpfile D:\work\dgraph\projects\dgraph-reddit\gulpfile.ts [21:56:58] Starting 'db:drop'... All Dgraph data dropped. [21:56:58] Finished 'db:drop' after 438 msIf all goes well you should see Gulp’s output similar to the above, indicating that the
db:droptask executed and that Dgraph data was dropped. You can open the Dgraph Ratel web UI to confirm this is the case. Just navigate to the Schema tab and you should see only the default schema predicate entries (which begin withdgraph.prefixes).Info If you receive a connection error indicating Dgraph is unavailable, double-check that theDgraphAdapter.addressproperty matches the Dgraph Alpha server URL in which you have Dgraph installed and running at.
Adding Environment Variables
Speaking of the Dgraph Alpha server address, it’s rather inconvenient to have to manually edit the static URL within the DgraphAdapter.address property anytime the Dgraph server changes, so let’s remedy this (and many future configuration headaches) by quickly adding environment variable support to our app.
Start by installing the dotenv package from NPM.
yarn add dotenv @types/dotenvThis package allows us to create
.envfiles in the project root directory that initialize environment variables.Create a new
.envfile in the project root directory.Add the following entry to the
.envfile, changing the URL to match your particular setup.DGRAPH_ALPHA_URL=http://localhost:8080Let’s add support for this new environment variable in
src/dgraph/DgraphAdapter. Open that file and defaultaddressproperty value toprocess.env.DGRAPH_ALPHA_URL.export class DgraphAdapter { public address = process.env.DGRAPH_ALPHA_URL; // ... }Now we need to bootstrap the
dotenvconfiguration by calling itsconfig()method, ideally before the rest of our application executes. Since we have Gulp tasks that are run separately from our Vue app we need to add the bootstrap code at the top of two files:gulpfile.tsandsrc/main.ts.import dotenv from 'dotenv'; dotenv.config(); import gulp from 'gulp'; import { DgraphAdapter } from './src/dgraph/DgraphAdapter'; gulp.task('db:drop', () => { try { return new DgraphAdapter().dropAll(); } catch (error) { throw error; } });import dotenv from 'dotenv'; dotenv.config(); import Vue from 'vue'; import App from './App.vue'; import router from './router'; import store from './store'; Vue.config.productionTip = false; new Vue({ router, store, render: h => h(App) }).$mount('#app');Any values we add to the
.envfile will now be available in theprocess.envobject throughout our app.With
DgraphAdapterupdated to use our env variable let’s test out that ourgulp db:dropcommand works.$ gulp db:drop [22:08:28] Requiring external module ts-node/register [22:08:29] Using gulpfile D:\work\dgraph\projects\dgraph-reddit\gulpfile.ts [22:08:29] Starting 'db:drop'... All Dgraph data dropped. [22:08:30] Finished 'db:drop' after 424 msIt should work just as well as before, but now we’re not using a static Dgraph Alpha server URL. This will come in handy throughout the app creation process.
Altering the Dgraph Schema
Now that we can drop data let’s alter the schema. As we’ll see shortly, it isn’t technically necessary to initially generate a schema for Dgraph data since Dgraph will generate predicates for us on the fly. However, we’ll probably want to specify at least some predicate schema later on so we can enable additional Dgraph features such as indexing.
Start by opening
src/dgraph/DgraphAdapter.tsand adding the newalterSchema()method.public async alterSchema(schema: string): Promise<boolean> { try { const payload: any = await this.client.alter({ schema }); if (payload.data.code && payload.data.code === 'Success') { console.info(`Dgraph schema altered.`); return true; } else { console.info(`Dgraph schema alteration failed.`); return false; } } catch (error) { console.error(`Dgraph schema alteration failed, error: %s`, error); return false; } }This method accepts a new schema
stringand performs an alteration using said schema.Now go back to the
gulpfile.tsand let’s add a newdb:schema:altertask.gulp.task('db:schema:alter', () => { try { return new DgraphAdapter().alterSchema(DGRAPH_SCHEMA); } catch (error) { throw error; } });This task passes an undefined
DGRAPH_SCHEMAvalue, so let’s initialize that at the top of thegulpfile.ts.const DGRAPH_SCHEMA = ` createdAt: dateTime @index(hour) . description: string @index(fulltext) @count . email: string @index(exact) @upsert . name: string @index(hash) @count . `;A Dgraph schema defines the data type for each given predicate using a
predicate: type [@directive(s)]format. Here we’re adding 4 predicates, each with anindexdirective. The specifics don’t matter for the moment, as we’re just using this to test that we’re able to alter the schema, so we can update this later as we build out the app.Our Gulp task is ready so let’s try it out.
$ gulp db:schema:alter
[01:23:26] Requiring external module ts-node/register
[01:23:27] Using gulpfile D:\work\dgraph\projects\dgraph-reddit\gulpfile.ts
[01:23:27] Starting 'db:schema:alter'...
Dgraph schema altered.
[01:23:27] Finished 'db:schema:alter' after 77 ms
Everything looks good from the console. We can confirm the schema was altered by checking the Schema tab of the Ratel web UI. We should now see the four new predicates, in addition to the baseline
dgraph.predicates.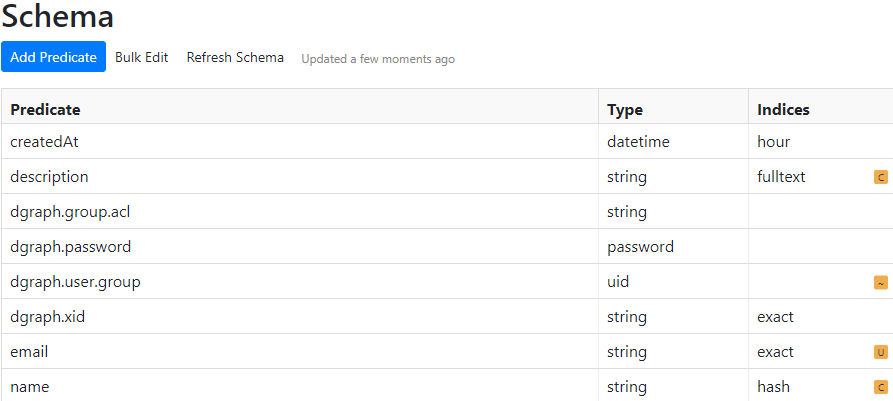
Adding Dgraph Mutations
The next milestone to add to our app is the ability to perform mutations within Dgraph. This will allow our app to add or remove data using a simple JSON format.
Open
src/dgraph/DgraphAdapter.tsand add aMutationTypesenum at the top, which we’ll use to help us differentiate which type of mutation we’re performing.export enum MutationTypes { DeleteJson, SetJson }Now let’s create the
DgraphAdapter.mutate()method, which will accept arequestpayload, perform the type of mutation we need, and potentially return anArrayofuidvalues that were created.public async mutate<T>({ request, mutationType = MutationTypes.SetJson, commitNow = false }: { request: any; mutationType?: MutationTypes; commitNow?: boolean; }): Promise<string[]> { if (request === undefined) { throw Error( `DgraphAdapter.mutate error, payload undefined for request: ${request}` ); } const transaction = this.client.newTxn(); let uids: string[] = []; try { const mutation: Mutation = {}; mutation.commitNow = commitNow; if (mutationType === MutationTypes.SetJson) { mutation.setJson = request; } else if (mutationType === MutationTypes.DeleteJson) { mutation.deleteJson = request; } const assigned: Assigned = await transaction.mutate(mutation); if (!commitNow) { await transaction.commit(); } uids = Object.entries(assigned.data.uids).map(([key, uid]) => uid); } catch (e) { console.error( 'DgraphAdapter.mutate, request: %o, mutationType: %o, error: %o', request, mutationType, e ); } finally { await transaction.discard(); } return uids; }The
mutatemethod accepts an object argument with arequestproperty which contains the JSON we’re mutating. We create a new transaction and instantiate a newMutationobject that comes fromdgraph-js-http. This object also shows that it can accept either asetJsonordeleteJsonproperty, which informsdgraph-js-httpwhether we’re adding or removing data. The optionalcommitNowproperty is used to tell Dgraph whether to immediately commit the mutation or not, so we use the passedcommitNowparameter to alter that behavior.After committing the mutation we
.mapthe results from theAssignedobject to the returneduidsarray.Back in the
gulpfile.tslet’s add a newdb:mutate:testtask to test our newDgraphAdapter.mutate()method.gulp.task('db:mutate:test', async () => { try { const request = { createdAt: new Date(), description: 'Hello, this is Alice!', email: 'alice@example.com', name: 'Alice Jones' }; const result = await new DgraphAdapter().mutate({ request }); console.log(result); } catch (error) { throw error; } });This Gulp task creates a plain object for our request and passes it to the
requestproperty of themutate()argument.Finally, execute the
gulp db:mutate:testcommand from a terminal.$ gulp db:mutate:test [16:54:15] Requiring external module ts-node/register [16:54:16] Using gulpfile D:\work\dgraph\projects\dgraph-reddit\gulpfile.ts [16:54:16] Starting 'db:mutate:test'... [ '0x4ce7d' ] [16:54:16] Finished 'db:mutate:test' after 53 msSure enough, this works just as expected and the awaited
resultis astring[]containing the list of newly-generateduidvalues in Dgraph. Since we only added a single node, we only receive a singleuidin return. Regardless, we knowDgraphAdapter.mutate()is ready to go. Time to move onto querying for existing data!
Querying Dgraph
To perform a Dgraph query we once again need to create a new transaction and pass our query string (and optional arguments) to retrieve some data. We’ll add the query() method to our DgraphAdapter class to help with this.
Open
src/dgraph/DgraphAdapter.tsand add the followingquerymethod.public async query<T>(query: string, vars?: object): Promise<any> { const transaction = this.client.newTxn(); let result; try { // Reduce optional vars to string values only. vars = vars ? Object.entries(vars).reduce((accumulator: any, value) => { accumulator[value[0]] = value[1].toString(); return accumulator; }, {}) : vars; const response: Response = vars ? await transaction.queryWithVars(query, vars) : await transaction.query(query); result = response.data; } catch (error) { console.error('DgraphAdapter.query, query: %o, error: %o', query, error); } finally { await transaction.discard(); } return result; }Similar to our other
DgraphAdapterhelper methods,query()creates a transaction, then passes ourquerystring to theTxn.query()orTxn.queryWithVars()method, depending if we’ve provided optionalvarsarguments. We extract the resulting data and return that result.Let’s add a simple Gulp task to help test out our queries as well. Inside
gulpfile.tsadd thedb:query:testtask seen below.gulp.task('db:query:test', async () => { try { const query = ` { user(func: eq(email, "alice@example.com")) { uid expand(_all_) { uid expand(_all_) } } } `; const result = await new DgraphAdapter().query(query); console.log(result); } catch (error) { throw error; } });Here we’re defining our first GraphQL+- query string, so let’s take a moment to break down the components of the query.
useris a user-defined and completely arbitrary name for the query block we’re defining. Since we’re looking at a user record of sorts, a name ofuserseems appropriate.func: eq(email, "alice@example.com")- GraphQL+- functions allow us to filter the results based on specified arguments, such as predicate values. In this case theeqfunction accepts a predicate and a value argument, and filters nodes in which that predicate value equals the passed value argument. Therefore, here we’re filtering for nodes where theemailpredicate equalsalice@example.com.uidis a special predicate type that is automatically generated and added to every node and uniquely identifies it. While typically represented in base 16 format the underlying value of auidis auint64.expand(_all_)- Theexpand()function is a special function that can be used to expand all child predicates passed to it. The_all_keyword is a shortcut that stands in for all predicates, soexpand(_all_)just tells Dgraph to expand and include every child predicate at that level of the node. As you can see above, such blocks can be chained together, so we can expand within another expansion as often as needed.
Tip Dgraph will ignore extra spacing around the query, so the formatting above is just for readability purposes. That same query could be written in a single line and would function just the same:{user(func:eq(email,"alice@example.com")){uid expand(_all_) {uid expand(_all_)}}}. You can learn much more about GraphQL+- query syntax in the official documentation.With our new
gulp db:query:testtask setup let’s finally test it out.$ gulp db:query:test [17:18:27] Requiring external module ts-node/register [17:18:28] Using gulpfile D:\work\dgraph\projects\dgraph-reddit\gulpfile.ts [17:18:28] Starting 'db:query:test'... { user: [ { uid: '0x4ce7d', email: 'alice@example.com', description: 'Hello, this is Alice!', createdAt: '2019-04-17T00:15:02.538Z', name: 'Alice Jones' } ] } [17:18:28] Finished 'db:query:test' after 41 msAwesome, everything works as expected. We can see that the returned result is a JavaScript
Objectthat contains our arbitraryuserproperty, which is assigned to an array of objects containing the resulting nodes that matched our query filter. Since our data set only contains a single matching node, only one was returned, but the nature of this data structure allows Dgraph to return arbitrarily-sized data based on the query results.
Reddit Data Dump
We’ll be using data dumps that come directly from Reddit and are provided by the pushshift.io project, which can be found here. There are a number of subcategories for the data that is available, but this tutorial will be focusing on just two categories: comments and submissions. If you’re familiar with Reddit, every top-level post is a submission, and then each submission can contain many child comments in response to that submission. Therefore, these two types of data will cover the majority of the information seen on the actual Reddit site.
Since these data sets start to get quite huge, we’ll just use a small sampling to popular our initial app data. We’ll grab daily dumps of both comments and submissions from two arbitrary dates of 2018-02-01 and 2018-02-02.
- RC_2018-02-01: http://files.pushshift.io/reddit/comments/daily/RC_2018-02-01.xz
- RC_2018-02-02: http://files.pushshift.io/reddit/comments/daily/RC_2018-02-02.xz
- RS_2018-02-01: http://files.pushshift.io/reddit/submissions/daily/RS_2018-02-01.xz
- RS_2018-02-02: http://files.pushshift.io/reddit/submissions/daily/RS_2018-02-02.xz
Create a
src/datadirectory and navigate into it.mkdir data && cd dataExecute the following curl commands (or whatever downloader you prefer) to grab the submission and comment data sets.
curl -O http://files.pushshift.io/reddit/submissions/daily/RS_2018-02-01.xz && curl -O http://files.pushshift.io/reddit/submissions/daily/RS_2018-02-02.xz
curl -O http://files.pushshift.io/reddit/comments/daily/RC_2018-02-01.xz && curl -O http://files.pushshift.io/reddit/comments/daily/RC_2018-02-02.xz
Once downloaded, extract the archived contents with the
unxz *.xzcommand, which will unzip all.xzfiles in the current directory.unxz *.xzInfo These files are approximately6GBin total size after decompression, so make sure you have appropriate disk space prior to this step.With the data extracted we can start adding it to Dgraph.
Adding Reddit Data to Dgraph
If you look at the content of one of the RS_ or RC_ Reddit data dump files, you’ll see they are in single-line JSON format. Here’s a submission record example.
{
  "archived": false,
  "author": "transcribersofreddit",
  "author_flair_css_class": null,
  "author_flair_text": "Official Bot",
  "brand_safe": false,
  "contest_mode": false,
  "created_utc": 1517443200,
  "distinguished": null,
  "domain": "reddit.com",
  "edited": false,
  "gilded": 0,
  "hidden": false,
  "hide_score": false,
  "id": "7ueit6",
  "is_crosspostable": false,
  "is_reddit_media_domain": false,
  "is_self": false,
  "is_video": false,
  "link_flair_css_class": "unclaimed",
  "link_flair_text": "Unclaimed",
  "locked": false,
  "media": null,
  "media_embed": {},
  "no_follow": true,
  "num_comments": 1,
  "num_crossposts": 0,
  "over_18": false,
  "parent_whitelist_status": null,
  "permalink": "/r/TranscribersOfReddit/comments/7ueit6/toomeirlformeirl_image_toomeirlformeirl/",
  "pinned": false,
  "retrieved_on": 1520467337,
  "score": 1,
  "secure_media": null,
  "secure_media_embed": {},
  "selftext": "",
  "send_replies": true,
  "spoiler": false,
  "stickied": false,
  "subreddit": "TranscribersOfReddit",
  "subreddit_id": "t5_3jqmx",
  "subreddit_type": "public",
  "suggested_sort": null,
  "thumbnail": "default",
  "thumbnail_height": 140,
  "thumbnail_width": 140,
  "title": "TooMeIrlForMeIrl | Image | \"TooMeIrlForMeIrl\"",
  "url": "https://reddit.com/r/TooMeIrlForMeIrl/comments/7ueit3/toomeirlformeirl/",
  "whitelist_status": null
}
As we already saw above, Dgraph’s GraphQL+- engine can accept JSON data within mutations, so we just need to create a helper function that can efficiently extract this data and push it to a Dgraph mutation. However, since these are rather large files, we cannot simply load and read their content from memory. The solution we’ll be using is Node Streams.
A stream in Node is a rather abstract concept that is used throughout the standard library. Conceptually, a stream is a collection of data similar to an array or object, with one major caveat: Stream data is temporal since it mutates over time. So, in the case of reading the data from our 2+ GB file, we don’t have to read it all at once and hold the data in memory, but we’ll instead use a stream that will slowly trickle the data in over time in chunks, which we’ll then process as needed.
We’ll start by installing the
event-streamlibrary, which is an extremely popular collection of helper methods for working with Node streams.yarn add event-stream && yarn add -D @types/event-streamIn this case, we’ll be using
event-streamto split our data by line and format it into JSON objects before we manipulate it with custom code. We’ll also be using [cli-progress]() to create a progress bar.Next, open the
src/dgraph/DgraphAdapter.tsfile and add the followingmutateFromStreammethod.import es from 'event-stream'; import * as CliProgress from 'cli-progress'; // ... public static async mutateFromStream({ stream, batchSize = 50, limit = 150 }: { stream: ReadStream; batchSize?: number; limit?: number; }) { const adapter = new DgraphAdapter(); let batch: any[] = []; let total = 0; const bar = new CliProgress.Bar( { stopOnComplete: true, format: '{bar} {percentage}% | Elapsed: {duration_formatted} | ETA: {eta_formatted} | {value}/{total} records' }, CliProgress.Presets.shades_classic ); // Start progress bar with maximum of limit. bar.start(limit, 0); const syncMutation = async (readStream: ReadStream, event?: string) => { try { // Pause during async. readStream.pause(); // Mutate batch const response = await adapter.mutate({ request: batch }); // Reset batch. batch = []; // Update progress bar. bar.update(total); // Resume after async. readStream.resume(); } catch (error) { // Stop progress bar. bar.stop(); console.log(error); } }; return new Promise((resolve, reject) => { stream .pipe(es.split()) .pipe(es.parse()) .on('data', async function(this: ReadStream, data: any) { // Add data to batch and update total count. batch.push(data); total++; if (total >= limit) { // Close stream if total exceeds limit. this.destroy(); } else if (batch.length === batchSize) { // Synchronously mutate if batch length meets batchSize. await syncMutation(this, 'data'); } }) .on('error', (error: Error) => { // Stop progress bar. bar.stop(); console.log(error); reject(error); }) .on('close', async function(this: ReadStream) { // Synchronously mutate if batch contains any extraneous records. if (batch.length > 0) { await syncMutation(this, 'close'); } // Stop progress bar. bar.stop(); resolve(`Stream closed, processed ${total} out of ${limit} records.`); }); }); }To see what the
mutateFromStreammethod is doing start down at thereturn new Promise()line, which begins the process of asynchronously reading data from aReadStreamobject. As mentioned above, we useevent-stream'ssplit()andparse()methods here to first split our data stream by line (the default), then parse that data into a JSON object.Each chunk of data passed to the
on('data', ...)event is a regular JavaScript object. Each data object is added to thebatcharray. We then check if the total number of records processed exceeds thelimitthreshold, in which case we destroy the stream immediately. Thelimitparameter can be used to process a certain number of objects from our data stream, which is useful when dealing with massive data sets like the Reddit dump files. Calling the.destroy()method of aReadStreamobject invokes theendevent (which we aren’t handling) and thecloseevent.If the current
batchsize equals thebatchSizeparameter (or if the stream is closing andbatchstill contains data) we invoke thesyncMutationfunction and await the result.syncMutationsynchronously pushes thebatchdata to Dgraph via theDgraphAdapter.mutatemethod. It’s critical that we explicitly pause the stream whileawaitingthe mutation result, in order to avoid race conditions and prevent building up back pressure (i.e. reading data faster than our Dgraph consumer can process it). Once abatchof data has been mutated and a response is receieved we reset thebatchcollection andresumethe stream as before.It’s also important to note that the stream always invokes the
closemethod at the end of its lifecycle, whether we.destroy()it for reaching our record limit, or because it simply processed all available stream data. Thus, we perform a final cleanup in casebatchcontains any extra records that weren’t processed within abatchSizechunk.Now that we’ve got the
mutateFromStreammethod we can test it out within a Gulp task. Before we do, however, let’s add the command line argument parsing library minimist.yarn add minimist && yarn add -D @types/minimistThis library provides some convenience for reading and handling additional arguments passed to terminal commands, such as Gulp tasks. This will allow us to dynamically provide arguments for
mutateFromStream, so we can adjust thebatchSizeandlimit, for example.In
gulpfile.tsadd the newdb:generate:datatask using the code below.gulp.task('db:generate:data', async () => { try { const args = minimist(process.argv.slice(3), { default: { batchSize: 250, limit: 1000, path: './src/data/RS_2018-02-01' } }); const stream = fs.createReadStream(args.path, { flags: 'r' }); // Include optional command line arguments in options. const result = await DgraphAdapter.mutateFromStream( Object.assign( { stream }, args ) ); console.log(result); } catch (error) { throw error; } });Here we’re creating a
ReadStreamfrom the2018-02-01Reddit submissions data set and then generating anoptionsobject that contains ourstreaminstance. We also specify thebatchSize,limit, andpathproperties, all of which receive default values using theminimistlibrary. Thepathproperty is used to create theReadStream, while the other arguments are passed toDgraphAdapter.mutateFromStream().Let’s test it out by running
gulp db:generate:datafrom the command line.$ gulp db:generate:data [21:47:07] Requiring external module ts-node/register [21:47:08] Using gulpfile D:\work\dgraph\projects\dgraph-reddit\gulpfile.ts [21:47:08] Starting 'db:generate:data'... ████████████████████████████████████████ 100% | Elapsed: 3s | ETA: 0s | 5000/5000 records Stream closed, processed 1000 out of 1000 records. [21:47:11] Finished 'db:generate:data' after 3.42 sThe output should look something like the above. During progression you should notice that the record count is properly increasing by the
batch.lengthsize of250, which means our code is aggregating anArrayof250objects read from thedatastream event prior to performing aDgraphAdapter.mutate()call. We can also see that we’re correctly processing only thelimitnumber of records (1000, by default) before the stream is destroyed and closed.Let’s also confirm that we can override the default
batchSizeandlimitparameters by providing matching--argumentsto thegulp db:generate:datacommand. Let’s try abatchSizeof123and alimitof2000$ gulp db:generate:data --batchSize 123 --limit 2000 [21:52:07] Requiring external module ts-node/register [21:52:08] Using gulpfile D:\work\dgraph\projects\dgraph-reddit\gulpfile.ts [21:52:08] Starting 'db:generate:data'... ████████████████████████████████████████ 100% | Elapsed: 7s | ETA: 0s | 5000/5000 records Stream closed, processed 2000 out of 2000 records. [21:52:42] Finished 'db:generate:data' after 7.82 sAwesome, both our argument overrides are working as expected. The last thing to do is confirm that the data is showing up in Dgraph as expected.
Open up the Ratel UI (http://localhost:8000/?latest), navigate to Console > Query and run the following query. We’re explicitly filtering out the, well, explicit content from the query below to ensure this is safe for work, but feel free to remove those filters throughout the tutorial if you want to ensure everything is as accurate as possible.
{
  data(func: has(author), first: 10) @filter(eq(over_18, false)) {
    uid
    expand(_all_) {
      uid
      expand(_all_)
    }
  }
}
You should see a list of the first
10submissions that contain anauthorpredicate.
{
  data(func: has(author), first: 10) @filter(eq(over_18, false)) {
    uid
    expand(_all_) {
      uid
      expand(_all_)
    }
  }
}curl http://127.0.0.1:8080/query -XPOST -d '
{
data(func: has(author), first: 10) @filter(eq(over_18, false)) {
uid
expand(_all_) {
uid
expand(_all_)
}
}
}' | python -m json.tool | less
package main

import (
  "context"
  "flag"
  "fmt"
  "log"
  "github.com/dgraph-io/dgraph/client"
  "github.com/dgraph-io/dgraph/protos/api"
  "google.golang.org/grpc"
)

var (
  dgraph = flag.String("d", "127.0.0.1:9080", "Dgraph server address")
)

func main() {
  flag.Parse()
  conn, err := grpc.Dial(*dgraph, grpc.WithInsecure())
  if err != nil {
    log.Fatal(err)
  }
  defer conn.Close()


  dg := client.NewDgraphClient(api.NewDgraphClient(conn))


  resp, err := dg.NewTxn().Query(context.Background(), `blahblah`)

  if err != nil {
    log.Fatal(err)
  }
  fmt.Printf("Response: %s\n", resp.Json)
}Alright, we can improve our import capabilities later on if needed, but for now the DgraphAdapter.mutateFromStream and gulp db:generate:data task work well to efficiently import data from our Reddit data dump sources, so we can move onto implementing our front-end Vue components to use that data!
Set Dgraph Schema
Before we add a great deal of data we should take this opportunity to setup a real Dgraph schema so certain predicates are indexed.
Let’s start by creating a new file at
src/dgraph/DgraphSchema.tsand paste the following into it.export const DgraphSchema = { Comment: ` author: string @index(hash) @count . author_flair_css_class: string @index(hash) . author_flair_text: string @index(hash) . body: string @index(hash, fulltext) . can_gild: bool @index(bool) @count . controversiality: int @index(int) @count . created_utc: dateTime @index(day) . distinguished: string @index(hash) @count . edited: bool @index(bool) @count . gilded: int @index(int) @count . id: string @index(hash) @count . is_submitter: bool @index(bool) @count . link_id: string @index(hash) @count . parent_id: string @index(hash) @count . permalink: string @index(hash) . retrieved_on: dateTime @index(day) . score: int @index(int) @count . stickied: bool @index(bool) @count . subreddit: string @index(hash) . subreddit_id: string @index(hash) . subreddit_type: string @index(hash) . `, Post: ` archived: bool @index(bool) @count . author: string @index(hash) @count . brand_safe: bool . contest_mode: bool @index(bool) @count . created_utc: dateTime @index(day) . domain: string @index(hash) . edited: bool @index(bool) @count . gilded: int @index(int) @count . hidden: bool @index(bool) @count . hide_score: bool @index(bool) @count . id: string @index(hash) . is_crosspostable: bool @index(bool) @count . is_reddit_media_domain: bool @index(bool) . is_self: bool @index(bool) @count . is_video: bool @index(bool) @count . locked: bool @index(bool) @count . no_follow: bool @index(bool) @count . num_comments: int @index(int) . num_crossposts: int @index(int) . over_18: bool @index(bool) @count . parent_whitelist_status: string . permalink: string @index(hash) . pinned: bool @index(bool) . post_hint: string @index(hash) . preview: uid @count @reverse . retrieved_on: dateTime @index(day) . score: int @index(int) . selftext: string @index(hash, fulltext) . send_replies: bool @index(bool) @count . spoiler: bool @index(bool) @count . stickied: bool @index(bool) @count . subreddit: string @index(hash) . subreddit_id: string @index(hash) . subreddit_type: string @index(hash) . thumbnail: string @index(hash) . title: string @index(hash, fulltext) . url: string @index(hash) . whitelist_status: string @index(hash) . ` };We’ve split the schema into two groups to represent both
CommentandPostnodes. It’s worth noting that a handful of the predicates used are shared across both types, but that’s a major advantage to a graph database: We don’t have to explicitly differentiate between each predicate based on what other predicates it is associated with for a given node. For example, thesubredditpredicate is used in comment and post nodes, but Dgraph will intelligently associate thesubredditpredicate value with whatever node we’re looking at.Open up the
gulpfile.tsand delete theconst DGRAPH_SCHEMAschema declaration at the top and replace it with animportfor the exportedDgraphSchemaconstant above.import { DgraphSchema } from './src/dgraph/DgraphSchema';Also in
gulpfile.tswe need to adjust thedb:schema:alterGulp task to use both schema strings we specified in the other file.gulp.task('db:schema:alter', () => { try { return Promise.all([ new DgraphAdapter().alterSchema(DgraphSchema.Comment), new DgraphAdapter().alterSchema(DgraphSchema.Post) ]); } catch (error) { throw error; } });Since
DgraphAdapter.alterSchema()returns aPromisewe can use thePromise.all()method and pass it a collection of promises. This ensures that thedb:schema:altertask only completes after the database has been updated using both schema sets.Now drop the existing data and then update the schema with the
db:schema:altercommand.gulp db:drop gulp db:schema:alter
Regenerate Full Data Set
With our schema setup we can now add some significant data to the system that our Vue app can work with. The following commands will add 10,000 submissions and 50,000 comments from the exported Reddit data sets, but feel free to adjust the limit to suit your needs.
gulp db:generate:data --limit 5000 --path ./src/data/RS_2018-02-01 && gulp db:generate:data --limit 5000 --path ./src/data/RS_2018-02-02
gulp db:generate:data --limit 25000 --path ./src/data/RC_2018-02-01 && gulp db:generate:data --limit 25000 --path ./src/data/RC_2018-02-02
This may take a couple minutes to complete, but once that’s done you’ll have a decently-sized data set to work with for the remainder of the tutorial.
[22:12:16] Requiring external module ts-node/register
[22:12:18] Using gulpfile D:\work\dgraph\projects\dgraph-reddit\gulpfile.ts
[22:12:18] Starting 'db:generate:data'...
████████████████████████████████████████ 100% | Elapsed: 22s | ETA: 0s | 5000/5000 records
Stream closed, processed 5000 out of 5000 records.
[22:12:40] Finished 'db:generate:data' after 22 s
[22:12:41] Requiring external module ts-node/register
[22:12:42] Using gulpfile D:\work\dgraph\projects\dgraph-reddit\gulpfile.ts
[22:12:42] Starting 'db:generate:data'...
████████████████████████████████████████ 100% | Elapsed: 24s | ETA: 0s | 5000/5000 records
Stream closed, processed 5000 out of 5000 records.
[22:13:06] Finished 'db:generate:data' after 24 s
[22:13:07] Requiring external module ts-node/register
[22:13:08] Using gulpfile D:\work\dgraph\projects\dgraph-reddit\gulpfile.ts
[22:13:08] Starting 'db:generate:data'...
████████████████████████████████████████ 100% | Elapsed: 42s | ETA: 0s | 25000/25000 records
Stream closed, processed 25000 out of 25000 records.
[22:13:50] Finished 'db:generate:data' after 42 s
[22:13:51] Requiring external module ts-node/register
[22:13:53] Using gulpfile D:\work\dgraph\projects\dgraph-reddit\gulpfile.ts
[22:13:53] Starting 'db:generate:data'...
████████████████████████████████████████ 100% | Elapsed: 1m3s | ETA: 0s | 25000/25000 records
Stream closed, processed 25000 out of 25000 records.
[22:14:56] Finished 'db:generate:data' after 1.03 min
Working with Vue
Now that our Dgraph connection is established and we’ve seeded the database with some initial data it’s time to start creating our front-end application pages via Vue. We’ll start by creating the most basic component of a Reddit-like app: the Post list. Below is a rough sketch of what that component should look like when we’ve created it in HTML and CSS.

To help us out we’ll use a Vue framework based on Google’s Material Design specifications called Vuetify. Like other front-end frameworks, it provides some out-of-the-box CSS and custom HTML elements we can use to create our app.
Configuring Vuetify
Add the Vuetify material design framework via
Vue CLI.vue add vuetifyIf you get an error while trying to install the plugin with default settings due to large files in the
src/datadirectory try addingsrc/datato your.gitignore, then run the Vuetify installer again and select manual configuration using the following settings.? Choose a preset: Configure (advanced) ? Use a pre-made template? (will replace App.vue and HelloWorld.vue) No ? Use custom theme? No ? Use custom properties (CSS variables)? No ? Select icon font Material Icons ? Use fonts as a dependency (for Electron or offline)? No ? Use a-la-carte components? Yes ? Select locale EnglishAfter the install completes edit the
src/plugins/vuetify.tsfile that was automatically added and change the lineimport Vuetify from 'vuetify/lib';toimport Vuetify from 'vuetify';.import Vue from 'vue'; import Vuetify from 'vuetify'; import 'vuetify/src/stylus/app.styl'; Vue.use(Vuetify, { iconfont: 'md', options: { customProperties: true }, theme: { primary: '#f96315', secondary: '#29b6f6', accent: '#ffc046', info: '#73e8ff', warning: '#c17900', error: '#d32f2f', success: '#43a047' } });As of the time of writing there is currently a small bug with TypeScript and the Vuetify plugin installation when trying to access the direct
/libdirectory (types declarations cannot be found). The above change fixes that issue.As seen above, we also are overriding the default
themeproperty to specify some custom colors, but feel free to play around with those values to get a look you prefer. Theoptions.customPropertiesvalue oftruewill allow us to explicitly use CSS properties generated by Vuetify throughout the application, so we can reference theme colors and the like within component CSS.You can also opt to use pre-defined colors by adding
import colors from 'vuetify/es5/util/colors';to the top of the file, then referencing those colors within the customthemeproperty.It should be added automatically, but make sure the
src/main.tsimports this newsrc/plugins/vuetify.tsfile after theVueimport.import Vue from 'vue'; import './plugins/vuetify';Finally, open the
public/index.htmlfile and make sure the following stylesheet links exist, which will import the Roboto font and the Material Icons set for us.<!DOCTYPE html> <html lang="en"> <head> <!-- ... --> <link rel="stylesheet" href="https://fonts.googleapis.com/css?family=Roboto:100,300,400,500,700,900" /> <link rel="stylesheet" href="https://fonts.googleapis.com/css?family=Material+Icons" /> </head> <!-- ... --> </html>With that, Vuetify should be setup and ready for use as we start creating our own components.
Post Component
Since we’re using TypeScript we gain some benefits of using class-based components within Vue. We can combine the vue-class-component library with the vue-property-decorator library to dramatically reduce the lines of code required in our components by using assorted decorators.
.vue file. The biggest advantage for us is separation of concerns, so each component is self-contained and can be used anywhere we need it throughout the app. Check out the official documentation for far more details on Single File Components.
Start by installing both the
vue-class-componentandvue-property-decoratorlibraries.yarn add vue-class-component vue-property-decoratorCreate a new
src/components/Post.vuefile and add the following template outline.<template></template> <script lang="ts"> import { Component, Prop, Vue } from 'vue-property-decorator'; @Component export default class Post extends Vue { @Prop() private id!: string; } </script> <style scoped lang="scss"></style>These three sections are what makeup a
.vuesingle file component. The top section contains the HTML template, the middle contains the JavaScript, and the bottom contains the CSS styling. As you can see, by adding thelang="ts"property to the<script>element we can tell our editor and parser that we’re using TypeScript. Similarly, thelang="scss"tells the parser our styling will use Sass.Tip Sass is a mature and powerful CSS extension that works with any normal CSS, but provides a number of useful features such as variables, nesting, and mixins. Check out the full guide for more information on using Sass.The
@Componentdecorator that precedes ourPostclass declaration is provided by thevue-class-componentlibrary. It allows us to define parts of our component more succinctly than normal. For example, a normal Vue component would register statedataby returning an object with child properties.export default { data() { return { id: 1234, name: 'Alice' }; } // ... };Similarly, computed properties that provide complex logic to otherwise normal component properties are defined within a
computedobject.export default { computed: { lowercaseName() { return this.name.toUpperCase(); } } // ... };However, with the
@Componentdecorator on a Vue class component we can simplifydataandcomputedproperty declarations.@Component export default class extends Vue { id = 1234; name = 'Alice'; get lowercaseName() { return this.name.toUpperCase(); } }As you can see,
dataproperties are now defined by declaring class members andcomputedproperties are class getter methods! Generally, most aspects of Vue component definitions are simplified through the use ofvue-class-decoratorandvue-property-decorator.
Post Component HTML
Since we’ll be reusing the Post.vue component we want to define the HTML so it looks like a single row from our Post List mockup image.
We’ll be using Vuetify’s grid system, which is based on the standard CSS flexbox. This allows us to split our layout into a series of responsive columns (12 of them in this case).
We’ll start by adding the
<v-layout>element within the root<template>element.<template> <v-layout class="post" row wrap my-2> </v-layout> </template>The grid system uses a progressive series of elements:
<v-container>- The base element of a grid system. Should contain one or more<v-layout>elements.<v-layout>- Similar to a<v-container>, but multiple<v-layout>can exist within a single<v-container>, providing the ability for grids within other grids.<v-flex>- The “content holder” element of a grid. The underlyingflexCSS property of a<v-flex>is set to1, which means a series of<v-flex>elements will attempt to responsively fill out the space they are given within their parent<v-layout>.
We’ll actually specify the parent
<v-container>element in another component further up the chain, since we don’t want each individualPostelement to be a container unto itself. The<v-layout>rowclass ensures we’re flexing across rows (not columns). We also want children to be able to wrap if needed. Finally, we’ll make heavy use ofmarginand/orpaddingthroughout this component by using the Vuetify CSS spacing classes. So, themy-2class translates intomargin: 2px 0;since we want a 2-pixel margin along the y-axis (top and bottom).Our
Postlayout has three distinct horizontal sections: Voting, thumbnail image, and post content. Therefore, we’ll split each of those sections into their own<v-flex>element. Let’s start by adding the voting flexbox.<template> <v-layout class="post" row wrap my-2> <v-flex class="votes" xs1 px-1 mx-1> <v-icon class="arrow up accentuated">arrow_upward</v-icon> <span class="score">1234</span> <v-icon class="arrow down accentuated">arrow_downward</v-icon> </v-flex> </v-layout> </template>We’re making use of the Material Icons pack that is part of the library, in addition to adding some helper classes we’ll use later.
Info Thexs1CSS class helper seen in the<v-flex>element above works like many other responsive frameworks.xsis one of Vuetify’s display options and it sets a breakpoint for viewports under600px. We don’t really want to worry about viewports for this tutorial, so using thexsextreme lets us effectively not have a breakpoint to worry about (since all displays should meet that criteria). The1followingxsis the number of columns our flexbox is spanning.Next, let’s add another flexbox as a sibling to the
.votesflexbox with the.thumbnailclass.<template> <v-layout class="post" row wrap my-2> <v-flex class="votes" xs1 px-1 mx-1> <v-icon class="arrow up accentuated">arrow_upward</v-icon> <span class="score">1234</span> <v-icon class="arrow down accentuated">arrow_downward</v-icon> </v-flex> <v-flex class="thumbnail" xs1 px-1 mx-1> <a href="#"> <v-img :src="`https://lorempixel.com/70/70`" :lazy-src="`https://dummyimage.com/70x70/f5f5f5/f96515&text=D`" aspect-ratio="1" height="70" width="70" /> </a> </v-flex> </v-layout> </template>We’re pulling some placeholder images for now and setting their size to
70x70pixels. The special:lazy-src<v-img>property is helpful when you want to display a temporary image while the full, normal image loads in the background.Our third flexbox is the
.contentclass.<template> <v-layout class="post" row wrap my-2> <v-flex class="votes" xs1 px-1 mx-1> <v-icon class="arrow up accentuated">arrow_upward</v-icon> <span class="score">1234</span> <v-icon class="arrow down accentuated">arrow_downward</v-icon> </v-flex> <v-flex class="thumbnail" xs1 px-1 mx-1> <a href="#"> <v-img :src="`https://lorempixel.com/70/70`" :lazy-src="`https://dummyimage.com/70x70/f5f5f5/f96515&text=D`" aspect-ratio="1" height="70" width="70" /> </a> </v-flex> <v-flex class="content" xs10 px-1 mx-1> <span class="title"> <a href="#" class="text--primary" >Lorem ipsum dolor sit amet, consectetur adipiscing elit. Praesent eu maximus sem. Aliquam erat volutpat. Aliquam maximus efficitur ligula eu vestibulum.</a > <span class="domain text--secondary caption ml-1 font-weight-bold" >(<a href="/r/AskReddit" class="text--secondary accentuated" >self.AskReddit</a >)</span > </span> <span class="tagline caption"> submitted 5 hours ago by <a class="accentuated" href="/user/JustSomeGuy">JustSomeGuy</a> to <a class="accentuated" href="/r/AskReddit">r/AskReddit</a> </span> <ul class="buttons font-weight-medium"> <li class="comment"> <a href="#" class="text--secondary accentuated">75 comments</a> </li> <li class="share"> <a href="#" class="text--secondary accentuated">share</a> </li> <li class="save"> <a href="#" class="text--secondary accentuated">save</a> </li> <li class="toggle"> <a href="#" class="text--secondary accentuated">hide</a> </li> <li class="award"> <a href="#" class="text--secondary accentuated">give award</a> </li> <li class="report"> <a href="#" class="text--secondary accentuated">report</a> </li> <li class="crosspost"> <a href="#" class="text--secondary accentuated">crosspost</a> </li> </ul> </v-flex> </v-layout> </template>We want the content to take up the majority of the remaining space, so we set the flexbox width to
xs10to take up 10 out of the 12 total columns. Thetext--primaryandtext--secondaryclasses are references to theme CSS properties. It’s helpful to use such classes wherever possible so that we can change the look of the entire app with just a few color changes to the theme.We’re also playing with the font weighting for a number of elements, just to make things appear more like they do in the actual Reddit.
Post Component CSS
Alright, we’ve got our rough HTML layout but we need to add some additional custom styling beyond the helper classes we used from Vuetify.
Update the <style></style> section of src/components/Post.vue to look like the following.
<style scoped lang="scss">
.post {
  .votes {
    max-width: 40px;
    text-align: center;

    * {
      display: block;
    }
  }

  .thumbnail {
    max-width: 70px;
  }

  .content {
    a {
      text-decoration: none;
    }

    .buttons {
      display: block;
      list-style-type: none;
      padding: 1px 0;

      li {
        display: inline-block;
        line-height: 1.5em;
        padding-right: 0.33em;
      }
    }

    .title {
      display: block;
      font-weight: bold;
    }
  }
}
</style>
We won’t go into much detail here since most of this is basic CSS, but it’s worth mentioning that the use of Sass lets us nest our CSS selectors. This means that rules inside .post { .votes { ... } } will only apply to .votes found within .post, but not elsewhere. It also helps to visually mimic the hierarchical structure found in the HTML.
Post Component Script
At this point, we aren’t actually implementing any logic into the Post component, so the script section can be left as is. We’ll come back to it shortly once we have our layout looking like we want. For now, let’s move up the chain and create the PostList component that will use instances of our Post component.
PostList Component
Create a new src/components/PostList.vue file and add the following to it.
<template>
  <v-container grid-list-xs>
    <Post v-for="i of 20" :key="i"></Post>
  </v-container>
</template>

<script lang="ts">
import { Component, Prop, Vue } from 'vue-property-decorator';
import Post from '@/components/Post.vue';

@Component({
  components: { Post }
})
export default class PostList extends Vue {}
</script>

<style scoped lang="scss"></style>
As mentioned before, here is where we’ve added the <v-container> element that specifies we want a grid list. Within that container we’re using a v-for loop to render a list of Post elements. Normally v-for would be used to render a collection of objects from data, but for testing purposes we’re just using a collection of numbers. As with React and other frameworks, we must ensure we pass a unique :key property value when iterating through a list.
The script is fairly simple and similar to what we saw in the Post component, but we’re passing an object to the @Component directive and specifying that our components property contains the Post component. Now all we have to do is get our app to render the PostList component and we’ll be in business!
Handling Global Sass Variables
We need a convenient way to inject custom CSS throughout the app, which we can do by modifying the CSS Webpack loader.
Create a
src/assets/css/main.scssfile and add the following Sass..accentuated { &:hover { color: var(--v-accent-base) !important; } }Notice that we’re using the
--v-accent-basevariable, which is generated automatically because we passedoptions.customPropertiesto the Vuetify declaration in Configuring Vuetify.We’ll use this file for global CSS that we need access to throughout the app. However, in order for
scopedCSS within a.vuefile to have access to the globalsrc/assets/css/main.scssfile we need to modify the Webpack loadercsssettings so it’ll import the file automatically.Open
vue.config.jsand add the followingcss: { ... }property.module.exports = { // ... css: { loaderOptions: { sass: { data: `@import "~@/assets/css/main.scss";` } } } };Now in the
src/components/Post.vuecomponent where we use theaccentuatedclass we’ll see:hovereffects using the accent base color specified in our Vuetify theme.Warning Unfortunately, Vuetify defaults to using the!importantflag for a number of its generated CSS classes. Therefore, if you notice custom CSS changes aren’t taking affect you may have to resort to adding the!importantflag to your own CSS rules intended to take precedence.
Updating the App and Home Components
The default Vue layout looks neat and all, but we obviously need to get rid of that starter stuff so our app functions like we want.
Delete the
src/views/About.vuefile.rm src/views/About.vueOpen
src/App.vueand change the contents to the following.<template> <v-app> <v-navigation-drawer app> <router-link to="/">Home</router-link> </v-navigation-drawer> <v-toolbar app></v-toolbar> <v-content> <v-container fluid> <router-view></router-view> </v-container> </v-content> <v-footer app></v-footer> </v-app> </template> <style lang="scss"></style>This gives us a basic app layout with a navigation bar, a footer, a toolbar, and our primary content section.
Open
src/views/Home.vueand modify the contents to the following.<template> <PostList /> </template> <script lang="ts"> import { Component, Vue } from 'vue-property-decorator'; import PostList from '@/components/PostList.vue'; @Component({ components: { PostList } }) export default class Home extends Vue {} </script> <style lang="scss"></style>This should look familiar as the structure is almost identical to what we saw in the
PostListcomponent.That’s it! Now just run the dev server with
yarn serveto launch the updated app.yarn serve
It should look something like the above screenshot.
Querying Dgraph
Now that our PostList component is configured it’s time to populate it with actual data from Dgraph.
Managing State With the Vuex Library
As is common practice with Vue applications we’ll be using the vuex library which provides common statement management patterns similar to those found in React/Redux and the like. Similar to Redux, Vuex uses a combination of actions and mutations to perform one-way transactions. An action never modifies the state and, instead, merely provides instruction for a mutation to perform actual state changes.
Vuex will already be installed if you used the same configuration found in Create a Vue CLI Project. However, if not, feel free to add it manually via npm or yarn.
yarn add vuexWe’re going to store everything about our state management in the
src/statedirectory, so create that now if needed.mkdir stateAdd the following
importto yoursrc/main.tsfile.import { store } from '@/state/store';This file will be the entry point for all Vuex store management.
Create the following files within the
src/statedirectory.actions.tsindex.tsmutations.tsstate.tsstore.tstypes.ts
Open
src/state/store.tsand add the following code to it.import Vuex from 'vuex'; import Vue from 'vue'; import { Actions } from '@/state/actions'; import { Mutations } from '@/state/mutations'; import { State } from '@/state/state'; Vue.use(Vuex); export const store = new Vuex.Store({ actions: Actions, mutations: Mutations, state: State });This file instantiates a new
Vuex.Storeinstance and sets the three critical properties to exported values that we’ll define in a moment.Open the
src/state/types.tsfile and paste the following into it.export const Types = { Action: { Post: { Get: { Paginated: 'Post.Get.Paginated' } } }, Mutation: { Post: { Set: { Paginated: 'Post.Set.Paginated' } } } };Vuex expects a given action or mutation to be defined by a unique
stringvalue key. However, it is useful to use enumerations or other static options to define these keys so you don’t need to manually remember and enter the names of the actions or mutations you’re performing. That’s what thetypes.tsfile above accomplishes. It will allow us to reference potentially complex action or mutation names through values the editor will verify.Open
src/state/actions.tsand add the following code.import { Types } from '@/state/types'; import { DgraphAdapter } from '@/dgraph/DgraphAdapter'; export const Actions = { async [Types.Action.Post.Get.Paginated]( { commit }: { commit: any }, { first = 50, offset = 0 }: { first?: number; offset?: number } ) { const { data } = await new DgraphAdapter().query( `query posts($first: int, $offset: int) { data(func: has(domain), first: $first, offset: $offset) @filter((not has(crosspost_parent)) and eq(over_18, false)) { uid expand(_all_) { uid expand(_all_) } } }`, { $first: first, $offset: offset } ); commit(Types.Mutation.Post.Set.Paginated, { posts: data }); } };Here is where we’re defining the actual actions that we want to be able to dispatch. The
Actionsobject is just a collection of functions and we’re naming them using the pre-definedTypesfound in thesrc/state/types.tsfile. In this case, we’ve defined anasyncaction named the value ofTypes.Action.Post.Get.Paginated.Vuex actions pass a
contextparameter which allows us to access the state (context.state) or commit a mutation (context.commit). Here, we only need access to thecommitfunction, so we’re destructuring it in the parameter definition (which is a common pattern when using Vuex). We’re also accepting a second set of custom arguments which we’ll use to adjust the logic of the action. Remember, actions can be asynchronous but cannot modify the state, but should just commit a mutation informing the state of a potential change.This GraphQL+- query we’re performing defines two GraphQL Variables (
$firstand$offset), which allows us to pass arguments to Dgraph to dynamically modify the query. Bothfirstandoffsetfilters are part of the built-in pagination options. Thus, the default values of50and0, respectively, will return the first50posts. The extra@filterdirectives used here are just to narrow the search down so we don’t get any crossposts, nor anything that might be NSFW.If you have Dgraph running locally you can test that query below.
query posts($first: int, $offset: int) { data(func: has(domain), first: 50, offset: 0) @filter((not has(crosspost_parent)) and eq(over_18, false)) { uid expand(_all_) { uid expand(_all_) } } }curl http://127.0.0.1:8080/query -XPOST -d '
query posts($first: int, $offset: int) { data(func: has(domain), first: 50, offset: 0) @filter((not has(crosspost_parent)) and eq(over_18, false)) { uid expand(_all_) { uid expand(_all_) } } } ' | python -m json.tool | lesspackage main import ( "context" "flag" "fmt" "log" "github.com/dgraph-io/dgraph/client" "github.com/dgraph-io/dgraph/protos/api" "google.golang.org/grpc" ) var ( dgraph = flag.String("d", "127.0.0.1:9080", "Dgraph server address") ) func main() { flag.Parse() conn, err := grpc.Dial(*dgraph, grpc.WithInsecure()) if err != nil { log.Fatal(err) } defer conn.Close() dg := client.NewDgraphClient(api.NewDgraphClient(conn)) resp, err := dg.NewTxn().Query(context.Background(), `blahblah`) if err != nil { log.Fatal(err) } fmt.Printf("Response: %s\n", resp.Json) }As you may recall from Querying Dgraph the call to
DgraphAdapter().query()lets us pass optional arguments, and if they exist it will invoke thetxn.queryWithVars()method from thedgraph-js-httplibrary.Once the result of our query has returned we finish by calling the
commit()method to invoke the appropriate mutation. Since the action name wasPost.Get.Paginatedto invoke a retrieval of posts that we pass as the payload argument to our mutation, the mutation we’ll commit isPost.Set.Paginated. We could name these anything we want and may want to change them in the future, but this seems like an appropriate name for a mutation that changes the paginated post list.Speaking of mutations, open
src/state/mutations.tsand paste the following into it.import { Types } from '@/state/types'; export const Mutations = { [Types.Mutation.Post.Set.Paginated](state: any, { posts }: { posts: any[] }) { state.posts = [...state.posts, ...posts]; } };As with the
Actionsobject exported fromsrc/state/actions.ts, theMutationsobject is a collection of mutation methods. The first parameter provided by Vuex is the current state, which is required and will be used to update or mutate the state within the handler function. We’ve also opted to pass an optional second argument that contains custom data used to process this mutation. Here we’re destructuring thepostsproperty that was passed via thecommit()method in our action, and setting thestate.postsvalue to it.The final step is to open
src/state/state.tsand set the initial state values for any state properties we’ll be using. In this case, we just have thepostsproperty used above.export const State = { posts: [] };
Using State in the PostList Component
Now that our state is configured and we can extract some paginated post data we need to add that functionality to our src/components/PostList.vue component.
Open
src/components/PostList.vueand add the followinggetPosts()computed property andcreated()lifecycle method to thePostListclass. Don’t forget the new{ Types }importas well.<script lang="ts"> import { Component, Prop, Vue } from 'vue-property-decorator'; import Post from '@/components/Post.vue'; import { Types } from '@/state'; @Component({ components: { Post } }) export default class PostList extends Vue { get getPosts() { return this.$store.state.posts; } public async created() { // Get post list. await this.$store.dispatch(Types.Action.Post.Get.Paginated, { first: 100, offset: 0 }); } } </script>Vue has a number of component lifecycle hooks, one of which is
created. Thevue-class-componentlibrary lets us add run code during these lifecycle hooks by declaring class methods with the matching names and passing functions that should be executed during those hooks. Thus, thepublic async create()method fires after thePostListcomponent instance is created. In it we await the result dispatching thePost.Get.Paginatedaction with extra optional arguments. As we saw above, this will retrieve the data from Dgraph and then commit a mutation to update the state.The
getPostsgetter is a computed property, which means that Vue will intelligently evaluate the value of this property and dynamically re-render any components that rely on this property when the value changes. Therefore, when thestate.postsproperty changes, the value of thegetPostsproperty is also updated.To make use of
getPostslet’s update thePostList.vueHTML section as seen below.<template> <v-container grid-list-xs> <Post v-for="post in getPosts" :key="post.id" v-bind="post"></Post> </v-container> </template>Vue provides a number of helper directives which are HTML attributes that begin with
v-.v-for- Loops over a collection. We used this before to loop over a collection of numbers for dummy data, but here we’re using it to iterate over the collection returned by thegetPostscomputed property seen above.v-bind- Dynamically binds an attribute to a value. Typically this is written in the form ofv-bind:attr-name="value", but if we exclude the attribute name then Vue will automatically pass (i.e.bind) every property of the object in question to the component.:key-v-bindalso has a shorthand syntax that lets us avoid typing thev-bindprefix. By using just the colon followed by the attribute we can replicate a binding, so here we’re binding thekeyattribute to the value ofpost.id.
The PostList component is updated and is properly passing data to the Post instances it creates, but we need to update the Post component to actually display that data.
Binding Data in the Post Component
Open
src/components/Post.vueand change the<script>section to the following.<script lang="ts"> import { Component, Prop, Vue } from 'vue-property-decorator'; @Component export default class Post extends Vue { @Prop(String) private id!: string; @Prop(String) private author!: string; @Prop(String) private created_utc!: Date; @Prop(String) private domain!: string; @Prop(Boolean) private is_self!: boolean; @Prop(Number) private num_comments!: number; @Prop(String) private permalink!: string; @Prop(Number) private score!: number; @Prop(String) private subreddit!: string; @Prop(String) private thumbnail!: string; @Prop({ default: 70 }) private thumbnail_height!: number; @Prop({ default: 70 }) private thumbnail_width!: number; @Prop(String) private title!: string; @Prop(String) private url!: string; get authorUrl() { return `/user/${this.author}`; } get domainUrl() { if (this.is_self) { return this.subredditUrl; } else { return `/domain/${this.domain}`; } } get fullUrl() { return this.is_self ? this.permalink : this.url; } get hasAuthor() { return this.author !== '[deleted]'; } get subredditUrl() { return `/r/${this.subreddit}`; } get thumbnailUrl() { if (this.thumbnail === 'self') { return require('../assets/images/thumbnail-self.png'); } else if (this.thumbnail === 'default') { return require('../assets/images/thumbnail-default.png'); } else { return this.thumbnail; } } } </script>This may look a bit overwhelming at first, but really we’ve just added two types of data to the
Postcomponent: properties and computed properties. Let’s start with the properties list. These properties are defined using the@Propdecorator to specify their types, name, default values, and so forth. The names are taken directly from the properties of our Dgraph predicates used by a Post node.As mentioned before, computed properties are specified by a getter method within the class component, so we’re using such computed properties to “calculate” additional logic. We won’t go over them all, but
thumbnailUrl()is a good example as it allows us to return the proper post thumbnail URL based on the possible values found in the database.Tip ThethumbnailUrl()property references two custom thumbnail images which you can download and add to yoursrc/assets/images/directory to include them in your own project. They can be found in the src/assets/images directory of the GitHub repository.Next, let’s update the HTML section of the
Post.vuecomponent. We’ll go through each of the threev-flexelements one at time.<v-flex class="votes" xs1 px-1 mx-1> <v-icon class="arrow up accentuated">arrow_upward</v-icon> <span class="score">{{ score }}</span> <v-icon class="arrow down accentuated">arrow_downward</v-icon> </v-flex>The only change here is to use the actual
scoreproperty passed to thePostcomponent instance. Vue’s text interpolation syntax merely requires surrounding a property value with double curly braces (aka “mustaches”). This syntax is used all the time within Vue templates, so you’ll see it frequently.The second flexbox section should be updated as seen below.
<v-flex class="thumbnail" xs1 px-1 mx-1> <a :href="fullUrl"> <v-img :src="thumbnailUrl" :lazy-src="thumbnailUrl" aspect-ratio="1" height="70" width="70" /> </a> </v-flex>We’re no longer using static URL strings, but instead are binding
:href,:src, and:lazy-srcattributes to computed property functions.The last flexbox should look like the following.
<v-flex class="content" xs10 px-1 mx-1> <span class="title"> <a :href="fullUrl" class="text--primary">{{ title }}</a> <span class="domain text--secondary caption ml-1 font-weight-bold" >(<a :href="domainUrl" class="text--secondary accentuated" >{{ domain }}</a >)</span > </span> <span class="tagline caption"> submitted {{ created_utc | moment('from') }} by <a class="accentuated" :href="authorUrl" v-if="hasAuthor" >{{ author }}</a > <span v-else>{{ author }}</span> to <a class="accentuated" :href="subredditUrl">r/{{ subreddit }}</a> </span> <ul class="buttons font-weight-medium"> <li class="comment"> <a :href="permalink" class="text--secondary accentuated" >{{ num_comments }} comments</a > </li> <li class="share"> <a href="#" class="text--secondary accentuated">share</a> </li> <li class="save"> <a href="#" class="text--secondary accentuated">save</a> </li> <li class="toggle"> <a href="#" class="text--secondary accentuated">hide</a> </li> <li class="award"> <a href="#" class="text--secondary accentuated">give award</a> </li> <li class="report"> <a href="#" class="text--secondary accentuated">report</a> </li> <li class="crosspost"> <a href="#" class="text--secondary accentuated">crosspost</a> </li> </ul> </v-flex>Quite a lot has changed here, but the same rules as techniques used in the previous sections apply. The first notable addition is
submitted {{ created_utc | moment('from') }}. The pipe character indicates a Vue filter function, which simplifies text formatting within Vue templates. In this case, we’re using a specialmoment()filter function to transform thecreated_utcdate into a human-readable “X seconds ago” format.The other unknown addition is just below that in which we use the
v-ifandv-elsedirectives to determine if the post has a valid author. If so, a<a>link element is added to link to the author URL. Otherwise, no link is set and the author is printed in plain text. This mimics the Reddit behavior of[deleted]users who no longer have a user page, but may still have active comments or posts.The last step is to add the
vue-momentlibrary, which provides a filter function we can use in Vue that behaves similar toMoment.js.yarn add vue-momentOpen the
src/main.tsfile and add the following code to import and usevue-moment.import VueMoment from 'vue-moment'; Vue.use(VueMoment);
Alright, our Post component is updated and ready to display the data it receives from the parent PostList component. Save everything and run yarn serve to check out the new post list, which will show the first 100 post records in the database.
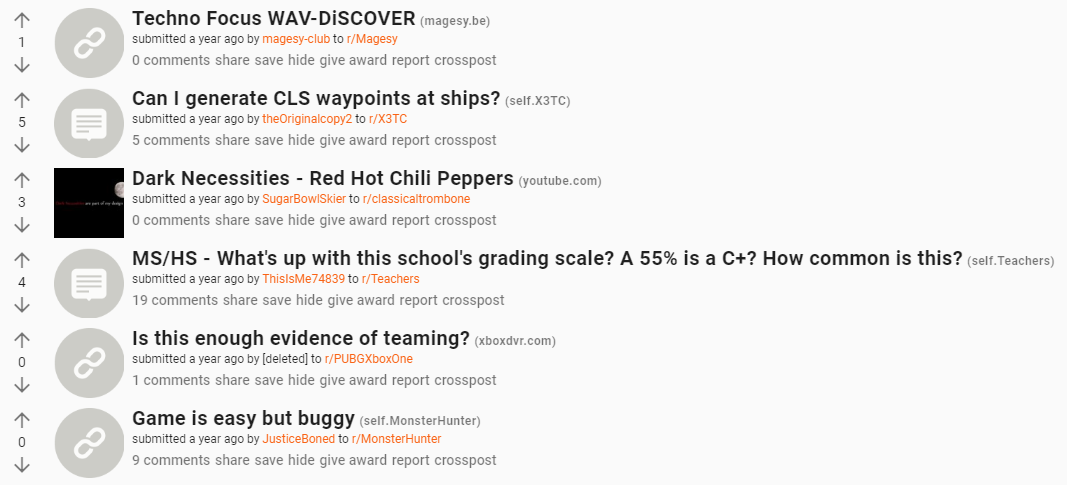
Adding Infinite Scrolling
The post list is working well, but one it’s missing one of the defining features of mass-content sites like Reddit: infinite scrolling. When we scroll to the bottom of the post list it should immediately load the next page of posts inline, without loading a new page.
Let’s start by adding the vue-mugen-scroll library that includes some built-in helper functionality. For example, we could add infinite scrolling pretty easily by checking the current scroll vs the window height, but we’d also need to perform a number of sanity checks like debouncing. Using
vue-mugen-scrollsolves this for us.yarn add vue-mugen-scrollOpen
src/components/PostList.vueand the following<mugen-scroll>element immediately after our<Post>element.<template> <v-container grid-list-xs> <Post v-for="post in getPosts" :key="post.id" v-bind="post"></Post> <mugen-scroll :handler="getPaginatedPosts" :handleOnMount="false"> Loading... </mugen-scroll> </v-container> </template>This tells the scroller to invoke the
getPaginatedPosts()method when the bottom of the viewport is reached. Since our component loads the first data set on its own we don’t need to invoke the handler on mount.In the
<script>sectionimport MugenScrolland add the newgetPaginatedPosts()method.// @ts-ignore import MugenScroll from 'vue-mugen-scroll'; @Component({ components: { MugenScroll, Post } }) export default class PostList extends Vue { get getPosts() { return this.$store.state.posts; } public async getPaginatedPosts() { // Get post list. await this.$store.dispatch(Types.Action.Post.Get.Paginated, { first: 100, offset: this.$store.state.posts.length }); } public async created() { // Get post list. await this.getPaginatedPosts(); } }Since we’re using the
mugen-scrollcomponent in the HTML section we need to include it in the referencedcomponentsproperty. We’ve also adjusted the logic of the component slightly, so thecreated()method just calls thegetPaginatedPosts()method directly, so all our retrieval logic is in one spot. Retrieving posts is nearly identical to how it worked before, but we’ve changed the passedoffsetargument to equal to current length of thestate.postsproperty. This handles pagination of the dataset automatically.
That’s all there is to it! If we save our changes and run yarn serve to see the new post list we can now infinitely scroll as seen below.
Adding Link Views
Now that our front page post list is complete the next milestone is to allow us to view the content of a given post. Although it may be a bit confusing at first, Reddit’s site terminology refers to the actual content of a given submission as a link. This makes sense when a submission is a outside URL to another resource, but the same term is also used to describe self submissions that remain within Reddit.
Therefore, while the front page post list view already handles outside content links for us, we need a component and router rule to handle the inner comment thread of a given link, which is in the form of /r/:subreddit/comments/:link/:slug.
Creating Custom Routes
Routing is provided by vue-router and can be configured quite easily. We already have the default route of / that renders the Home component, so we need to add another route to handle the /r/:subreddit/comments/:link/:slug route.
- Open the
src/router.tsfile. Add a new entry into the
routesproperty with apathof'/r/:subreddit/comments/:link/*'.import Link from '@/components/Link.vue';/ // .. export default new Router({ mode: 'history', base: process.env.BASE_URL, routes: [ { path: '/', name: 'home', component: Home }, { path: '/r/:subreddit/comments/:link/*', name: 'link', component: Link } ] });Make sure to also import the
Linkcomponent at the top. This route will now match link-specific URLs.
Adding Comments to the State
Since an internal link view displays a list of discussion comments we need to add comments to the app state and appropriate actions and mutations to update that property.
Open
src/state/state.tsand add thecommentsproperty with a default value of an empty array.export const State = { comments: [], posts: [] };Open
src/state/types.tsand add the newComment.Get.Paginatedaction andComment.Set.Paginatedmutation types.export const Types = { Action: { Comment: { Get: { Paginated: 'Comment.Get.Paginated' } }, Post: { Get: { Paginated: 'Post.Get.Paginated' } } }, Mutation: { Comment: { Set: { Paginated: 'Comment.Set.Paginated' } }, Post: { Set: { Paginated: 'Post.Set.Paginated' } } } };Open
src/state/mutations.tsand add a new entry for theComment.Set.Paginatedmutation method.import { Types } from '@/state/types'; export const Mutations = { [Types.Mutation.Comment.Set.Paginated]( state: any, { comments }: { comments: any[] } ) { state.comments = [...state.comments, ...comments]; }, // ... };Similar to how we update
posts,state.commentsare combined with existing comments in the state since this pagination mutation incrementally adds data.Next, open
src/state/actions.tsand add the following entry for theComment.Get.Paginatedaction method.export const Actions = { async [Types.Action.Comment.Get.Paginated]( { commit }: { commit: any }, { link, first = 50, offset = 0 }: { link: string; first?: number; offset?: number } ) { const { data } = await new DgraphAdapter().query( `query comments($link: string, $first: int, $offset: int) { data(func: eq(link_id, $link), first: $first, offset: $offset) { uid expand(_all_) { uid expand(_all_) } } }`, { $link: `t3_${link}`, $first: first, $offset: offset } ); commit(Types.Mutation.Comment.Set.Paginated, { comments: data }); }, // ... }This action invokes a GraphQL+- query to get all comments based on the passed
linkid argument. You’ll recall the route we’ll be parsing of'/r/:subreddit/comments/:link/*'. The:linkparam from that URL is in the database under thelink_idpredicate. The values are unique strings that look something like this:t3_7ub10c.Reddit IDs are a unique Base36 value prefixed by the relevant Reddit content type as seen below.
Prefix Type t1_ Comment t2_ Account t3_ Link t4_ Message t5_ Subreddit t6_ Award Therefore, a comment with a
link_idpredicate value oft3_7ub10ccorresponds to a submission/post with the id7ub10c. That’s why our query parameter object above prefixes thelinkvalue witht3_.
Creating the Comment Component
Now that we can detect link routes and our state is configured to retrieve comments based on those matching link IDs we can add a link view. Reddit link views are just a collection of comments that makeup that link’s discussion, so we’ll start with the Comment.vue component.
- Create a new
src/components/Comment.vuefile. Add the following
<template>HTML.<template> <v-layout class="comment" row wrap my-2> <v-flex class="votes" xs1 px-1 mx-1> <v-icon class="arrow up accentuated">arrow_upward</v-icon> <v-icon class="arrow down accentuated">arrow_downward</v-icon> </v-flex> <v-flex class="content" xs11 px-1 mx-1> <span class="tagline caption"> <a class="accentuated" :href="authorUrl" v-if="hasAuthor">{{ author }}</a> <span v-else>{{ author }}</span> <span class="score">{{ score }} points</span> {{ created_utc | moment('from') }} </span> <span class="body" v-html="body"></span> <ul class="buttons font-weight-medium"> <li class="permalink"> <a :href="permalink" class="text--secondary accentuated">permalink</a> </li> <li class="source"> <a href="#" class="text--secondary accentuated">share</a> </li> <li class="embed"> <a href="#" class="text--secondary accentuated">save</a> </li> <li class="save"> <a href="#" class="text--secondary accentuated">hide</a> </li> <li class="report"> <a href="#" class="text--secondary accentuated">report</a> </li> <li class="award"> <a href="#" class="text--secondary accentuated">give award</a> </li> <li class="reply"> <a href="#" class="text--secondary accentuated">reply</a> </li> <li class="hide-children"> <a href="#" class="text--secondary accentuated" >hide child comments</a > </li> </ul> </v-flex> </v-layout> </template>Reddit uses very similar formatting for comments as it does for posts, so we’re able to reuse a significant amount of the layout found in the
Post.vue. A comment consists of voting arrows on the side, the author at the top, the score of that comment, created date, body text of the actual comment, and then a series of interactive buttons at the bottom.There are a lot of properties we’re using within the template, so the majority of the
<script>section is just property definition.<script lang="ts"> import { Component, Prop, Vue } from 'vue-property-decorator'; @Component export default class Comment extends Vue { @Prop(String) private id!: string; @Prop(String) private author!: string; @Prop(String) private author_flair_text!: string; @Prop(String) private body!: string; @Prop(Boolean) private can_gild!: boolean; @Prop(Number) private controversiality!: number; @Prop(String) private created_utc!: Date; @Prop(String) private distinguished!: string; @Prop(Boolean) private edited!: boolean; @Prop(Number) private gilded!: number; @Prop(Boolean) private is_submitter!: boolean; @Prop(String) private link_id!: string; @Prop(String) private parent_id!: string; @Prop(String) private permalink!: string; @Prop(String) private retrieved_on!: Date; @Prop(Number) private score!: number; @Prop(Boolean) private stickied!: boolean; @Prop(String) private subreddit!: string; @Prop(String) private subreddit_id!: string; @Prop(String) private subreddit_type!: string; get authorUrl() { return `/user/${this.author}`; } get hasAuthor() { return this.author !== '[deleted]'; } get subredditUrl() { return `/r/${this.subreddit}`; } } </script>Lastly, add the following
<style>section.```css ```
The Comment.vue component is now ready to go, we just have to pass in a comment prop it can display.
Creating the Link Component
A Link.vue component will behave similar to the PostList.vue component by acting as a parent view for comments.
- Create a new Vue file at
src/components/Link.vue. Add the following to the HTML template section.
<template> <v-container grid-list-xs> <Comment v-for="comment in getComments" :key="comment.id" v-bind="comment" ></Comment> <mugen-scroll :handler="getPaginatedComments" :handleOnMount="false" ></mugen-scroll> </v-container> </template>Here we’re just creating a container and looping through all
Commentsprovided by thegetCommentsmethod. We’ll also use the same infinite scrolling helper we used in thePostList.vue.Let’s next add the
<script>section with the following code.<script lang="ts"> import { Component, Prop, Vue } from 'vue-property-decorator'; import Comment from '@/components/Comment.vue'; import { Types } from '@/state'; // @ts-ignore import MugenScroll from 'vue-mugen-scroll'; @Component({ components: { MugenScroll, Comment } }) export default class Link extends Vue { private loading = false; get getComments() { return this.$store.state.comments; } public async created() { await this.getPaginatedComments(); } public async getPaginatedComments() { await this.$store.dispatch(Types.Action.Comment.Get.Paginated, { link: this.$route.params.link, first: 50, offset: this.$store.state.comments.length }); } } </script>The logic is similar to what we used in
PostList.vue. thegetPaginatedComments()method dispatches theComment.Get.Paginatedaction and retrieves the first50comments with an offset of the currentstate.commentslength. We also pass the currentlinkparam obtained from the route. As we configured in the router, a route in the form of/r/:subreddit/comments/:link/*passes the:linkparam ID to the action and performs a Dgraph query to retrieve matching records.
Optimizing the Imported Data Set
We’re all set and should now be able to navigate to any link URL (i.e. /r/:subreddit/comments/:link/*). When viewing the home page post list these links are found in the post content for self. posts or by clicking the comments button of a post.
However, while this functionality works, we’re running into an unforeseen problem: A number of link views simply show no comments.
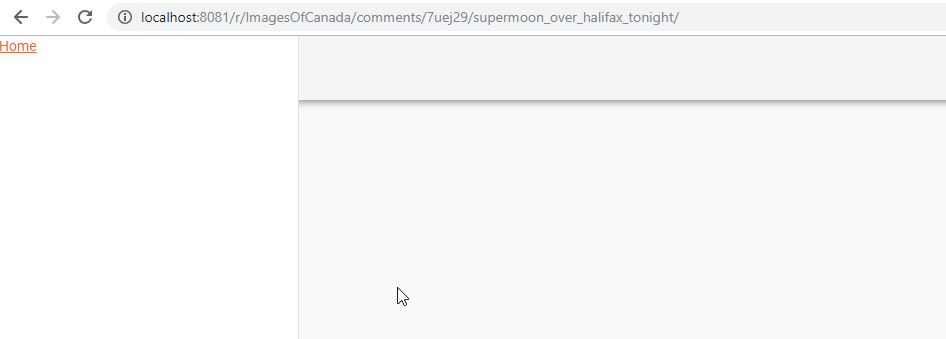
The problem here is our imported data set is incomplete. While we have tens of thousands of comments in the database, Reddit receives millions of comments per day, so our data set that contains data from just two days of submissions and comments contains a lot of “gaps.” It isn’t all that likely that a given submission within those two days also has a comment from those two days and is one of the comments we imported.
The solution is to add some minor logic to our data import functions and perform a new import. We’ll implement a few simple rules to dramatically improve the quality of our imported Reddit data, without having to add massive amounts of extra data or download more data dump files.
- Import comments into the database first.
- Import submission posts second, but run each of them through a validation function that checks the following criteria:
- The post must have at least one comment. While this isn’t accurate to the real Reddit, it’s better for our purposes in this tutorial to only look at posts that were commented on.
- At least one comment made on the post should be within the collection of comments already contained in the database.
With these validation rules setup we can ensure that we’re only adding posts that contain comments that are within the Dgraph database, which will eliminate the empty link view seen above.
Adjusting the Dgraph Mutation from Stream Logic
The DgraphAdapter.mutationFromStream method works great for importing from our massive data sets, but we need to add some additional logic so we can validate data before pushing it to the database.
Open src/dgraph/DgraphAdapter.ts and update the mutationFromStream() method to look like the following.
public static async mutateFromStream({
stream,
batchSize = 50,
limit = 150,
offset = 0,
validator
}: {
stream: ReadStream;
batchSize?: number;
limit?: number;
offset?: number;
validator?: (data: any) => void;
}) {
const adapter = new DgraphAdapter();
let batch: any[] = [];
let invalidCount = 0;
let skippedCount = 0;
let totalCount = 0;
const bar = new CliProgress.Bar(
{
stopOnComplete: true,
format:
'{bar} {percentage}% | Elapsed: {duration_formatted} | ETA: {eta_formatted} | {value}/{total} records'
},
CliProgress.Presets.shades_classic
);
// Start progress bar with maximum of limit.
bar.start(limit, 0);
const syncMutation = async (readStream: ReadStream, event?: string) => {
try {
// Pause during async.
readStream.pause();
// Mutate batch
const response = await adapter.mutate({ request: batch });
// Reset batch.
batch = [];
// Update progress bar.
bar.update(totalCount);
// Resume after async.
readStream.resume();
} catch (error) {
// Stop progress bar.
bar.stop();
console.log(error);
}
};
return new Promise((resolve, reject) => {
stream
.pipe(es.split())
.pipe(es.parse())
.on('data', async function(this: ReadStream, data: any) {
if (offset && offset > 0 && skippedCount < offset) {
skippedCount++;
} else if (validator ? validator(data) : true) {
// Add data to batch and update total count.
batch.push(data);
totalCount++;
if (totalCount >= limit) {
// Close stream if total exceeds limit.
this.destroy();
} else if (batch.length === batchSize) {
// Synchronously mutate if batch length meets batchSize.
await syncMutation(this, 'data');
}
} else {
invalidCount++;
}
})
.on('error', (error: Error) => {
// Stop progress bar.
bar.stop();
console.log(error);
reject(error);
})
.on('close', async function(this: ReadStream) {
// Synchronously mutate if batch contains any extraneous records.
if (batch.length > 0) {
await syncMutation(this, 'close');
}
// Stop progress bar.
bar.stop();
resolve(
`Processed ${totalCount +
invalidCount +
skippedCount} records (${totalCount} mutated, ${invalidCount} invalid, ${skippedCount} skipped).`
);
});
});
}
We added two new parameters: offset?: number; and validator?: (data: any) => void;. We won’t need to use offset here, but it seemed useful to include that functionality so we can skip a certain number of records from a data stream in the future, if needed. The validator argument is a function that accepts a single argument itself. We’ll use it to determine if the passed data object argument is valid and should be included in the exported data set or not.
The only other significant addition is in the .on('data', ...) function. We start by checking if there’s an offset specified, in which case we want to skip that many records before processing begins.
Next we check if a validator function was passed and, if so, whether the result of validating the current data object is true or not. If the data is valid, it is processed and added to a batch set as normal, otherwise we ignore that data and increment the invalidCount.
on('close', ...) now outputs the total number of records processed, including those that were mutated, skipped, and considered invalid.
Open the gulpfile.ts so we can adjust the db:generate:data task to perform the validation rules discussed above.
gulp.task('db:generate:data', async () => {
try {
const query = `{
data(func: has(link_id)) {
link_id
}
}`;
// Get current comments
const comments = _.map(
(await new DgraphAdapter().query(query)).data,
comment => comment.link_id.substring(3)
);
const args = minimist(process.argv.slice(3), {
default: {
batchSize: 250,
limit: 1000,
offset: 0,
path: './src/data/RS_2018-02-01'
}
});
const stream = fs.createReadStream(args.path, {
flags: 'r'
});
// Include optional command line arguments in options.
const result = await DgraphAdapter.mutateFromStream(
Object.assign(
{
stream,
validator: (data: any) => {
if (
data.domain &&
!data.crosspost_parent &&
!data.over_18 &&
// If comments exist check that post contains at least 1.
data.num_comments > 0 &&
(comments && comments.length > 0
? _.includes(comments, data.id)
: true)
) {
// Posts
return true;
} else if (data.link_id) {
// Comments
return true;
}
return false;
}
},
args
)
);
console.log(result);
} catch (error) {
throw error;
}
});
As mentioned above, we’ll be adding comments to the database first, so the task starts by querying Dgraph and retrieving the full collection of comment nodes.
{
data(func: has(link_id)) {
link_id
}
}curl http://127.0.0.1:8080/query -XPOST -d '
{
data(func: has(link_id)) {
link_id
}
}' | python -m json.tool | less
package main

import (
  "context"
  "flag"
  "fmt"
  "log"
  "github.com/dgraph-io/dgraph/client"
  "github.com/dgraph-io/dgraph/protos/api"
  "google.golang.org/grpc"
)

var (
  dgraph = flag.String("d", "127.0.0.1:9080", "Dgraph server address")
)

func main() {
  flag.Parse()
  conn, err := grpc.Dial(*dgraph, grpc.WithInsecure())
  if err != nil {
    log.Fatal(err)
  }
  defer conn.Close()


  dg := client.NewDgraphClient(api.NewDgraphClient(conn))


  resp, err := dg.NewTxn().Query(context.Background(), `blahblah`)

  if err != nil {
    log.Fatal(err)
  }
  fmt.Printf("Response: %s\n", resp.Json)
}As discussed in the Adding Comments to the State section Reddit prefixes link IDs with t3_ so the db:generate:data task removes that prefix since each post node’s id predicate does not contain that t3_ prefix.
Everything else in this task function is the same as before, except we’re passing the validator property to the DgraphAdapter.mutateFromStream method call. This validator function expects the single data argument and performs the validation rules discussed above. For posts we ensure they aren’t crossposts, that they aren’t NSFW, that they have at least one comment, and that at least one of those comments has a link_id equal to the id of the post record.
Update the Database Data Set
That’s all the validation logic we need, so now we just have to update the data set within the database to use our new validation rules.
Start by dropping the data with
gulp db:dropand then reset the schema withgulp db:schema:alter.$ gulp db:drop && gulp db:schema:alter [03:13:24] Requiring external module ts-node/register [03:13:25] Using gulpfile D:\work\dgraph\projects\dgraph-reddit\gulpfile.ts [03:13:25] Starting 'db:drop'... All Dgraph data dropped. [03:13:25] Finished 'db:drop' after 438 ms [03:13:26] Requiring external module ts-node/register [03:13:27] Using gulpfile D:\work\dgraph\projects\dgraph-reddit\gulpfile.ts [03:13:27] Starting 'db:schema:alter'... Dgrap schema altered. Dgrap schema altered. [03:13:27] Finished 'db:schema:alter' after 77 msImport comment data with
gulp db:generate:data. We’ll be using alimitof50000from each file this time, but feel free to adjust this number to suit your needs.$ gulp db:generate:data --limit 50000 --path ./src/data/RC_2018-02-01 && gulp db:generate:data --limit 50000 --path ./src/data/RC_2018-02-02 [03:21:30] Requiring external module ts-node/register [03:21:32] Using gulpfile D:\work\dgraph\projects\dgraph-reddit\gulpfile.ts [03:21:32] Starting 'db:generate:data'... ████████████████████████████████████████ 100% | Elapsed: 1m45s | ETA: 0s | 50000/50000 records Processed 50000 records (50000 mutated, 0 invalid, 0 skipped). [03:23:17] Finished 'db:generate:data' after 1.75 min [03:23:18] Requiring external module ts-node/register [03:23:20] Using gulpfile D:\work\dgraph\projects\dgraph-reddit\gulpfile.ts [03:23:20] Starting 'db:generate:data'... ████████████████████████████████████████ 100% | Elapsed: 2m51s | ETA: 0s | 50000/50000 records Processed 50000 records (50000 mutated, 0 invalid, 0 skipped). [03:26:11] Finished 'db:generate:data' after 2.85 minLastly, import post data with a
limitof5000for each day.$ gulp db:generate:data --limit 5000 --path ./src/data/RS_2018-02-01 && gulp db:generate:data --limit 5000 --path ./src/data/RS_2018-02-02 [03:26:46] Requiring external module ts-node/register [03:26:48] Using gulpfile D:\work\dgraph\projects\dgraph-reddit\gulpfile.ts [03:26:48] Starting 'db:generate:data'... ████████████████████████████████████████ 100% | Elapsed: 1m34s | ETA: 0s | 5000/5000 records Processed 189813 records (5000 mutated, 184813 invalid, 0 skipped). [03:28:23] Finished 'db:generate:data' after 1.58 min [03:28:24] Requiring external module ts-node/register [03:28:26] Using gulpfile D:\work\dgraph\projects\dgraph-reddit\gulpfile.ts [03:28:26] Starting 'db:generate:data'... ██████████████░░░░░░░░░░░░░░░░░░░░░░░░░░ 34% | Elapsed: 2m34s | ETA: 5m5s | 1688/5000 records Processed 376678 records (1688 mutated, 374990 invalid, 0 skipped). [03:31:02] Finished 'db:generate:data' after 2.58 minYou’ll notice our validator is working as expected and skipping the majority of the post submission records because they fail validation. In fact, if you used the same data dump files as in this tutorial, you’ll see the second file doesn’t even contain enough valid post records to meet our
limitof5000. Instead, the entire file is processed with only about1700valid submission to add.
In total this new import should take about 10 minutes to process but the end result is a much nicer data set within Dgraph! Try running the app again with yarn serve and you should be able to click on any comments link within the front page post list to navigate to that discussion and see at least one comment. No more empty link views!